Thursday, November 20, 2008

VELVETY, SWEET & BUTTERY ~ CHICKEN LIVER PATE

I've had good and sorta good and not really good at all liver pate. For me, I prefer my pate smooth as silk, and to have a faint sweetness. And I like to have a slight aroma of the Cognac still there. These elements make, for me anyway, the perfect pate. 

Most of the chicken liver pate recipes out there are pretty much just carbon copies of each other, so I had to write my own recipe for it, tailored to my own preference. It's velvety and delicious! 


Here's how it goes ...
 
I start by soaking the livers in milk. 


And I use sweet onions.  


It's fast to make too. Onion saute, then add the livers, then the liquids. Remove livers when they are medium, and reduce liquids. Let mixture cool, then into the processor for a quick whirl. 


Fill the ramekins, then top with clarified butter. And, maybe a few whole peppercorns for a bite. Chill. 

Enjoy! 


Ingredients

1 pound fresh chicken livers, cleaned
1 cup milk
10 tablespoons cold butter
1 stick of butter - clarified
1 cup chopped sweet onion, such as Mayan, Walla Walla or Maui
2 teaspoons chopped garlic
2 tablespoons green peppercorns, or 1 tablespoon black peppercorns
2 fresh bay leaves
1 teaspoon chopped fresh rosemary
1 teaspoon fresh thyme
1/2 teaspoon good sea salt
1 teaspoon sugar
1/2 teaspoon fresh ground pepper
1/4 cup Cognac + 1 tablespoon
4 tablespoons good red wine

To Prepare

Soak livers in milk for 2 hours. Drain well. 

In saute pan, melt 4 tablespoons butter and saute onions, thyme, peppercorns, bay & rosemary on medium heat for about 10-15 minutes until onions are translucent (do not brown). Add garlic and saute 5 minutes more. Add the chicken livers and gently saute a few minutes, then add 1/4 cup Cognac, red wine and sugar. Continue to cook over med heat until livers are brown on the outside, but still slightly pink inside (not red, just slightly pink). Remove livers to a plate so they don't overcook, and continue to cook liquids until most of the liquid has evaporated. Remove from heat and let livers and mixture cool at room temp. Discard bay leaves, and any stems from the thyme. 

While waiting to cool you can clarify your butter, you will need that to seal the top of the pate. 

Once cooled, put livers and mixture into food processor, along with the remaining 1 tablespoon of uncooked Cognac, and puree until completely smooth. Take remaining 6 tablespoons of the cold butter and cut into cubes -- Add butter to the puree in pieces, pulse to blend making sure it is completely incorporated. 

Fill small ramekins 2/3 full and carefully spoon clarified butter over the top to seal. The butter should completely seal the top of the pate, so depending on the type of dish you use, you may need more clarified butter.  Refrigerate for at least 4 hours before serving so it has a chance to really firm up.  

Serve with fresh, warm french bread or toasted slices of baguette. I don't like capers or cornichons with my pate, I never did understand the pairing -- to me they do not go together. I prefer figs or a good orange marmalade to bring out the sweetness in the pate. Sort of like you'd serve with foie gras. 

Pate can be stored in the refrigerator with unbroken butter seal for up to 2 weeks. 


Monday, November 17, 2008

VEAL CUTLETS w/ CHANTERELLE & MOREL MUSHROOM WINE SAUCE & BROWN BUTTER SPAGHETTI

Last night's dinner was a Veal cutlet - browned in a skillet and  topped with a Chanterelle and Morel mushroom white wine sauce. Side dish was a simple spaghetti with brown butter and a splash of cream. Our neutralizer to this rich Sunday dinner was an vinaigrette Arugula salad. 


Simply seasoned, salt and pepper. The flour I used to coat the cutlets had a little onion and garlic powder, as well as s&p also. 

I used dried mushrooms. I reconstituted them in a little boiling water (about 1/2 C). I reserved the lovely flavored water to add to the sauce later. 

Lightly coat the cutlets with the flour mixture, and brown in a hot pan of olive and canola oil. 

The mushrooms were chopped and sauteed for a minute in a little butter.

Then I added about 1/2 C Chardonnay and reduced until almost gone.

Lastly, I added the reserved mushroom broth with about 2 cups of homemade chicken stock. Let it reduce by two thirds, and then finished it with a pat of butter and a small splash of half & half. 


For the pasta ... 
I have started using this brown rice pasta I found at Trader Joe's. It's actually really good. I actually don't like brown rice, but that is mostly just because of texture. This pasta is good, tastes every bit as good and chewy as white pasta, but it has an aroma of rice. It's nice. And, much healthier than bleached white pasta. They way I look at it, it helps compensate a little for the brown butter and cream I added to the noodles. :)


Browned butter. We all love it, don't we? It's so good on so many things! The tasty little bits of browned cream that give all the flavor are obviously where all the yum comes from. Wanna know how to get more without using tons of butter?  


Yeah. Powdered milk. And no, I'm not kidding. Add a little sprinkle to your butter in the pan as it's melting and let the pieces of dehydrated milk brown with the butter.


Some final words.
I love veal, who doesn't... But I never buy it at the grocery store. I don't buy veal when I don't know where it came from -- I am an animal lover and I will only purchase free range Veal. But this was a rare exception. I saw 3 packages of Veal at Von's supermarket, in the "marked-down bin." It still had a few days left before the pull date, so it was still good, but they always throw out food a few days before their exp date, so I didn't want to chance it. Because the only thing worse than veal from an animal that has been been inhumanely raised, is when it is then thrown out as garbage. To me that is the ultimate in disrespect. So as hard as it was for me to buy this, at the same time it was impossible not to. I just had to get that off my chest.

Sunday, November 9, 2008

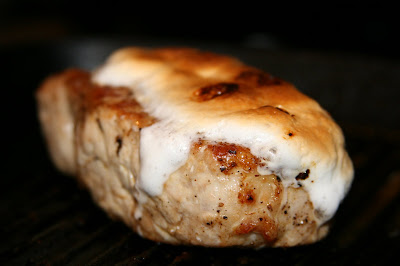
MARSHMALLOW CANDIED PORK CHOPS! WHOA BABY!!

(you like food p*rn? go ahead, click it. you know you wanna.)
When you were a kid, and you roasted marshmallows, did you like them barely toasted, or totally black? I liked them burnt to a crisp. And as an adult, I still like them super-crispy. Eat off the crispy layer, and re-char it. Oh yeah. 

Speaking of marshmallows. I bought a bag of mini marshmallows for a fudge recipe I recently acquired. The ingredients for the fudge have been sitting there for weeks -- I'm not into sweets too much. But for some reason, my mind has been crazy with recipe ideas lately. Maybe it's because I was on vacation and away from the kitchen for a week? 

The inspiration for this recipe came from the season. I have never seen anything like it before, but candied yams were always a favorite of ours at Thanksgiving. I don't know why, but I saw those marshmallows in the cupboard, and I had a vision;  pork + marshmallows = maybe something really good?  And guys, it works! Very well :)


I figured, for this recipe, the boneless loin chops would be best. 


Coat pork with veg oil and season simply with salt and pepper. 


Sear chops on a really hot cast iron pan, about 2 minutes on each side, then transfer to a 500 degree oven. Cook 4 minutes on each side for a 2" thick chop. Remove pan from oven. Increase the oven heat to broil. 

Add marshmallows to chops. Put chops on bottom rack (so marshmallows melt slower, and don't burn).  Cook until desired marshmallow doneness. 

Here's MY chop. :)


A-MAZING. This was every bit as good as it looks. The pork was tender and juicy, and the marshmallow candy crust was crunchy on the outside, gooey underneath -- My only complaint was that there wasn't enough marshmallow! 


Saturday, November 8, 2008

COOKING SCHOOL. WANNA GO? FOR FREE?

Or, at least live vicariously through someone who is going to cooking school ....

CHECK OUT THIS BLOG. 
  
Remember how much fun the French Laundry at Home blog was? Well, I think the Cooking School Sagittarius will also be fun. :)  Jennifer is going to cooking school. She is taking pictures, and documenting everything she learns.  She's on day 37 now, so you'll need to go to the start of the blog to obviously get the FULL educational benefit. 

I'm enjoying it! You GO girl!  


CREAM OF AVOCADO SOUP WITH BACON & EGGS


Avocado soup. Have you ever made it?  It's so easy -- literally takes only minutes -- and it's a great way to taste the freshness of summer, since avocado is a summery ingredient for most people, but the warmth and richness of a hearty winter soup that's going to fill you up and keep you satisfied without weighing you down. 

Adding things to the soup is also something I love to do, but I think it's best when the additions are minimal. Shredded chicken is probably my favorite, but bacon & eggs also go great with the avocado. 

Just a little bit of crispy bacon, and one scrambled egg ...

The broth and avocado are in the blender about to take a spin. After blended, I simply heat in a pan until flour is cooked and soup is slightly thickened. 

Maybe a drizzle of cream ...

Chop the bacon & eggs ...

Nice lunch.

Makes 4 cups, or 2 big bowls

2 1/2 cups chicken broth (homemade preferred)
4 Tbsp Wondra (or 2 Tbsp flour)
1 ripe California avocado
4 Tablespoons half & half or heavy cream (optional)

Dissolve the Wondra (or flour) in about 1/2 cup of warm but not hot chicken stock, then pour into a blender with the rest of the stock, and the avocado. Blend until desired consistency, I prefer it completely smooth. Once blended, transfer to a saucepan and heat until just starting to boil, then simmer for 10 minutes more, just to cook flour and to let the soup thicken a little. Add salt and pepper to taste. If I am in the mood for extra richness, I'll add a splash of half & half.

Monday, November 3, 2008

COOKING WITH BACON -- BACON WRAPPED BRUSSELS SPROUTS -- SIDE DISH


A while back I mentioned that I'd be working on side dishes. Easy recipes that would make the typically boring side dishes more interesting. But they had to be simple, and made without bizarre ingredients -- Just stuff you already have around the house. We often focus so much on the main dish that when it comes to the side dish, it's usually defaulted to something boring.  I'm just trying to mix it up. 

Well .... How do these look? Yummy, right? They were

It's not that I'm a huge fan of brussels sprouts. I don't hate them, but I don't love them either. Maybe this is why I'm on a quest for ways to make them great? Because they really are good for you. And I want to love them, I really do. 

The last bs dish I made was the brussels sprouts with balsamic vinegar caramelized onions. It was a big hit. A note on that dish though -- it's only good when it's fresh, so serve immediately, when they're hot. 

So now, my new recipe is a dead-simple one, because I just got back from vacation and I have a bad cold and I'm dog tired. Today I made BACON WRAPPED BRUSSELS SPROUTS.  I was at the grocery yesterday and I saw some pretty large brussels sprouts. I usually try and pick out the smallest ones, but I thought what the heck, let's try the jumbo ones and just see how they compare. 

They were really good!


Start by trimming the tough ends off. 

Then, simply wrap in bacon! I used 1/2 slice for each brussels sprout.  I also recommend using a toothpick at the seam to keep the bacon from shrinking and coming off the vegetable. 


Into a 450 oven for about 25-30 minutes (or until bacon is done and the BS is tender)


Tender inside... crisp, smoky bacon outside. Guys, these were delicious!